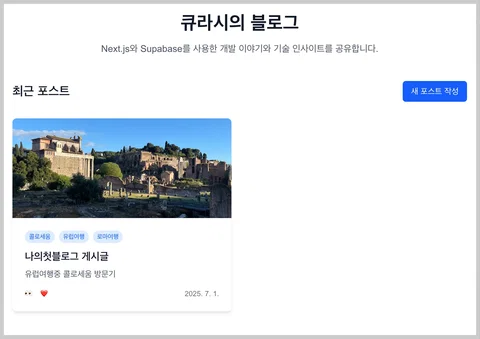
Next.js + Supabase 프로젝트 - (7) : Supabase CRUD, UI 코드 구현 (해당 파일들 전체 코드 공개)

이번 포스팅은 아래의 CRUD 구현에 대한 상세 설명으로 이어집니다.이번 포스팅은 내용은 컴팩트 하나, 코드를 첨부함에 따라 스크롤이 길 수는 있겠습니다ㅎㅎ 파일을 추가하는게 나을 수도 있을 텐데, 혹시나 다운로드의 부담도 있을 것 같아 코드로 적어두겠습니다 https://kyurasi.tistory.com/entry/Nextjs-Supabase-%ED%94%84%EB%A1%9C%EC%A0%9D%ED%8A%B8-6-CRUD-%EA%B5%AC%ED%98%84 Next.js + Supabase 프로젝트 - (6) : CRUD 구현이 포스팅은 아래의 포스팅에 이어지는 내용입니다.https://kyurasi.tistory.com/entry/Nextjs-Supabase-프로젝트-4-Github-연결-vercel-..
이번 포스팅은 아래의 CRUD 구현에 대한 상세 설명으로 이어집니다.
이번 포스팅은 내용은 컴팩트 하나, 코드를 첨부함에 따라 스크롤이 길 수는 있겠습니다ㅎㅎ 파일을 추가하는게 나을 수도 있을 텐데, 혹시나 다운로드의 부담도 있을 것 같아 코드로 적어두겠습니다
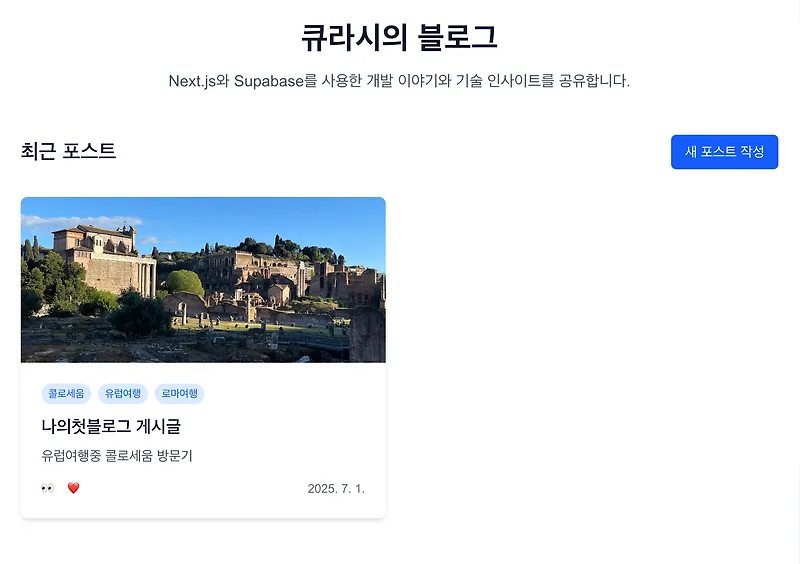 Next.js + Supabase 프로젝트 - (6) : CRUD 구현이 포스팅은 아래의 포스팅에 이어지는 내용입니다.https://kyurasi.tistory.com/entry/Nextjs-Supabase-프로젝트-4-Github-연결-vercel-배포-CICD-구현하기 Next.js + Supabase 프로젝트 - (5) : Github 연결, vercel 배포, CI/CD kyurasi.tistory.com
CRUD 를 하려면 일단 DB 를 만들어둔 Supabase 에서 필드들을 고려한 테이블을 하나 만들어 보겠습니다
1. 브라우저에서 나의 Supabase 프로젝트로 이동
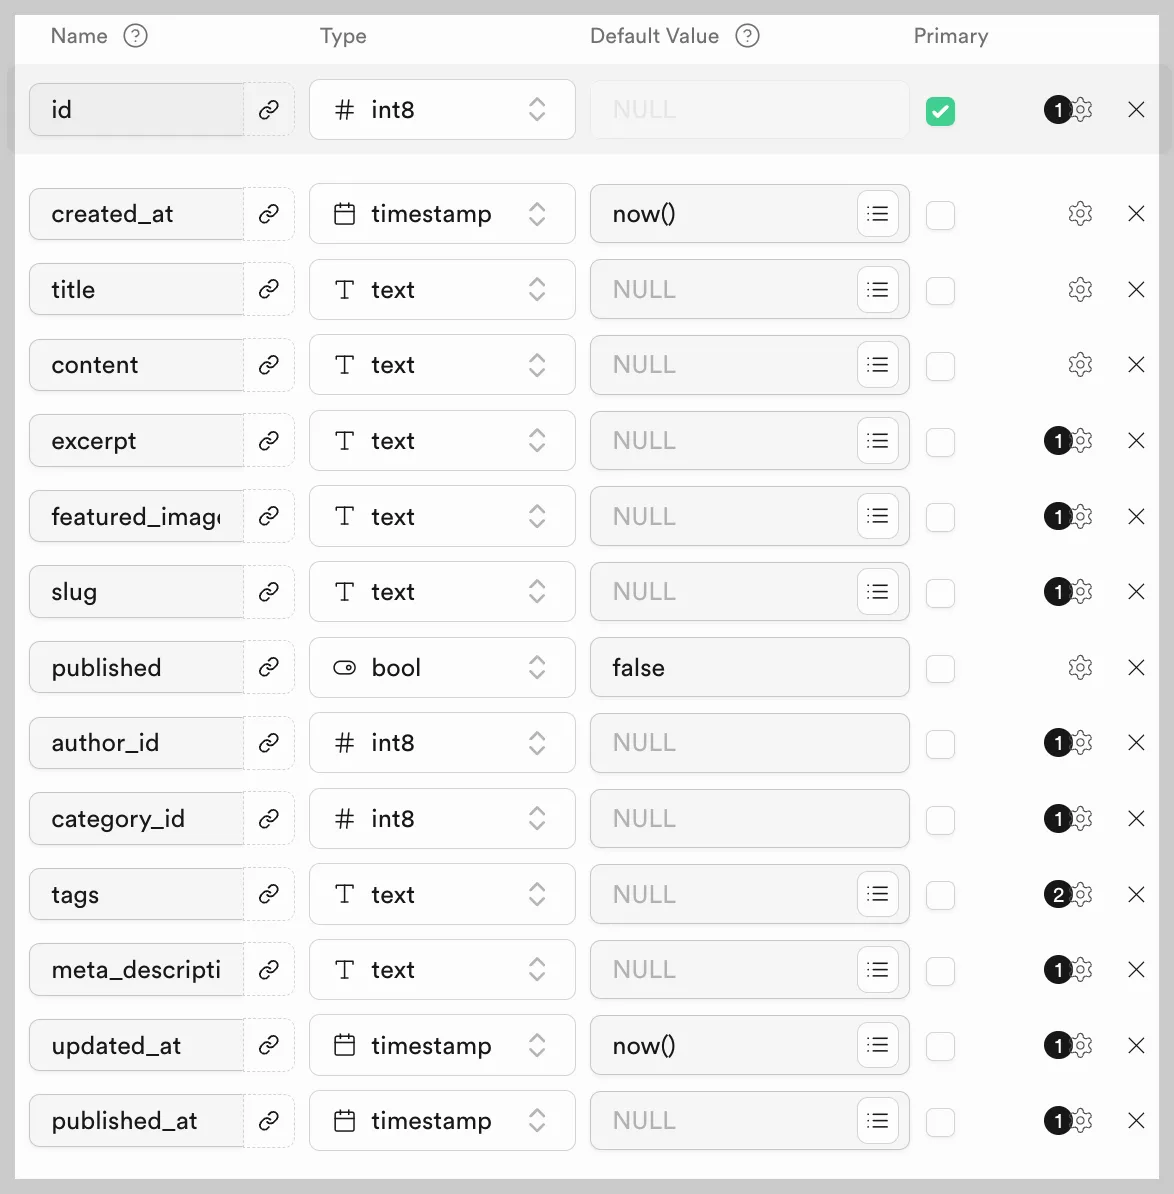
2. 프로젝트 선택 - 좌측 사이드바에서 Table Editor 선택, + 3. New table 클릭 후 좌측 사진처럼 필드들을 추가했습니다.
4. save 버튼을 눌러 저장
5. 프로젝트의 터미널로 들어가서 generate-types 명령어 실행
Enable Row Level Security 는 추후 변경할 예정이니 일단 체크를 끄겠습니다
저는 블로그를 만들 것이기 때문에 블로그에서 사용되는 포스팅 테이블을 만들겠습니다.
tags 필드는 오른쪽 톱니바퀴에서 Define as array 를 체크해줘야 합니다!
이 다음, 사진을 업로드 하기 위해 supabase 에 storage 를 만들어줘야 합니다. aws 의 s3 같은 이미지나 파일 업로드용과 같다고 보시면 됩니다.
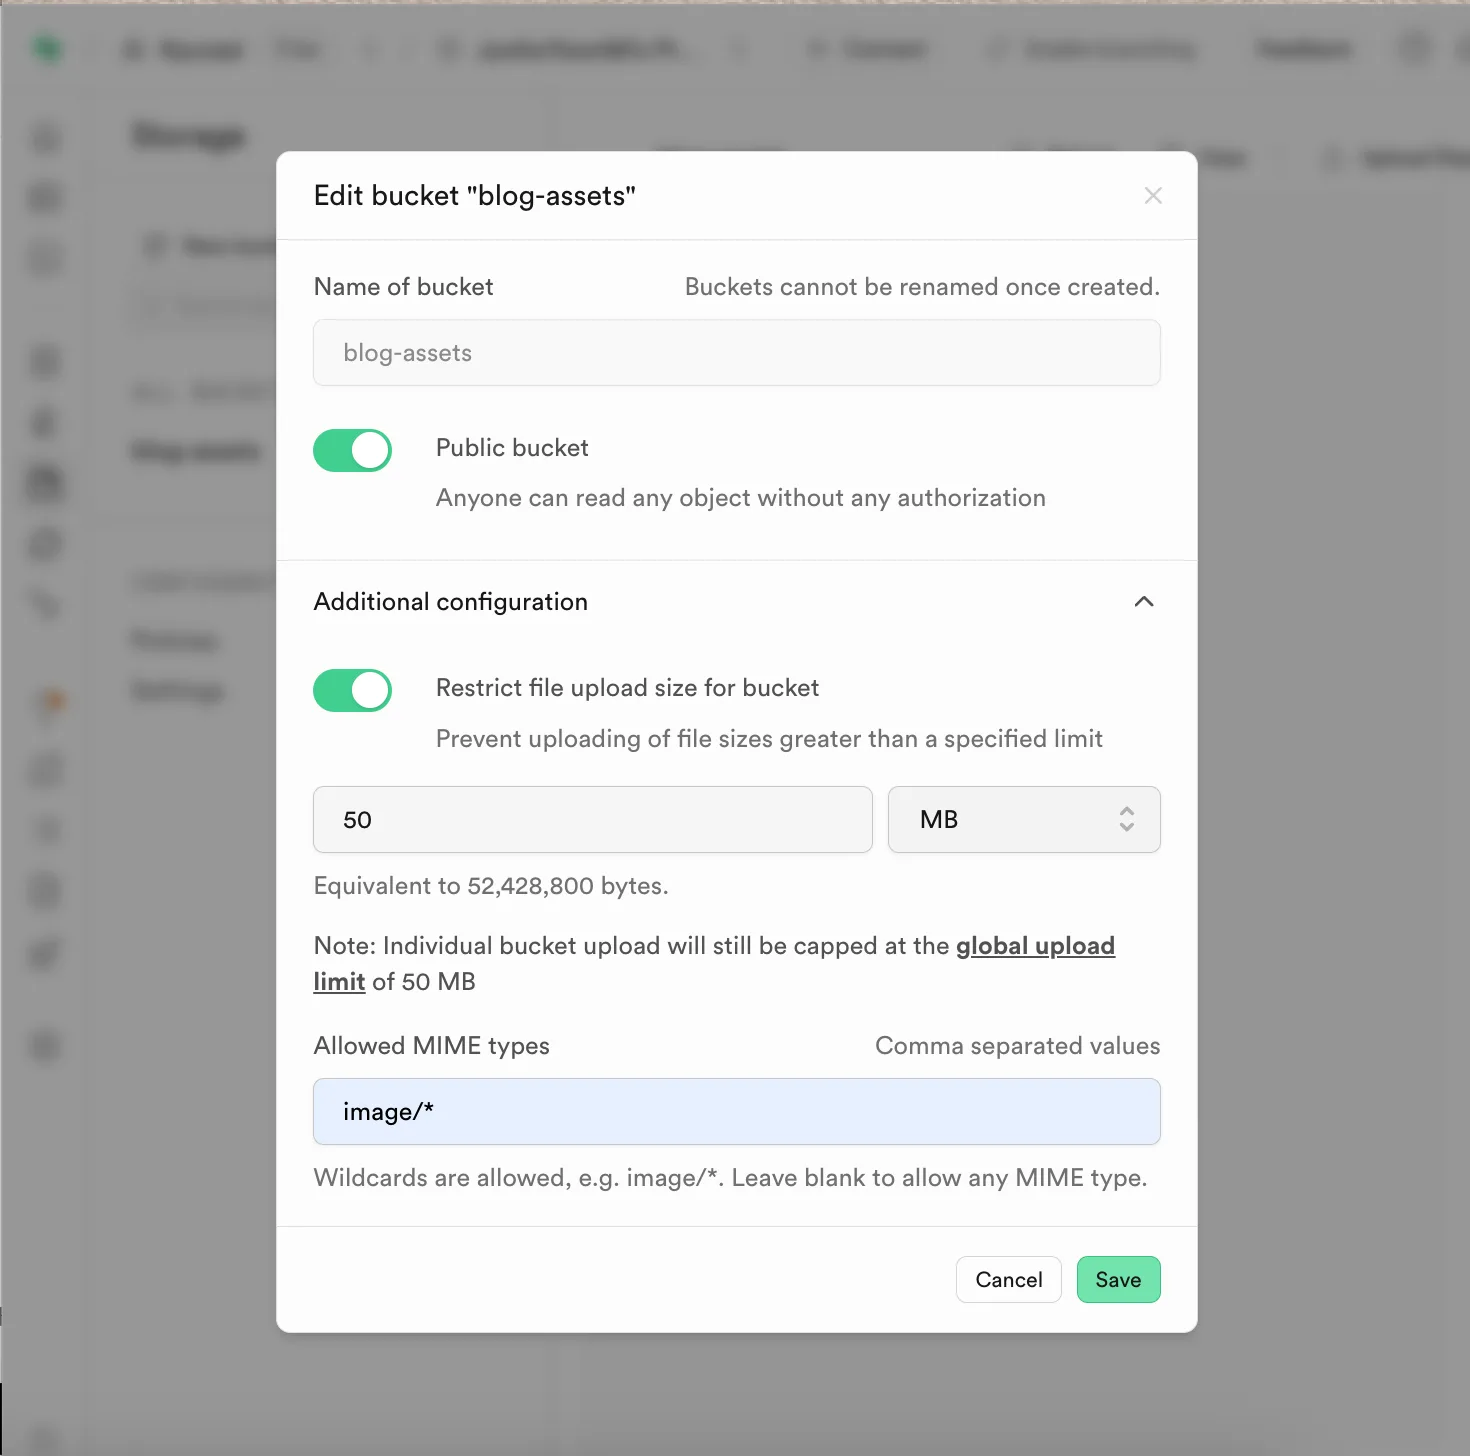
1. Supabase 프로젝트 - 좌측 사이드바에서 Storage 선택
2. 이름은 blog-assets로, Public 으로 만들어서 모든 사람들이 접근할 수 있도록 하게 합니다
3. file size 를 최대 50mb 로 하겠습니다. 너무 과도한 업로드를 방지합니다.
4. 업로드 할 수 있는 타입은 image/* 로 이미지만 업로드 하게 해줍니다. 다른 버켓에서 파일 업로드 가능하게 하면 됩니다.
5. 지금 페이지에서 Configuration - Policies 를 선택하고 blog-assets 에 New policy 로 for full cusomization 선택
6. 저는 Policy 이름을 anon 으로 하고, Allowed operation 을 전부 선택하고, Target roles 를 anon 으로 하겠습니다.
7. anon 이란 것은 전체에게 허가하겠다는 소리입니다.
Storage 까지 만들어 두었으면, 이전 package.json 에 해두었던 설정을 다시 한 번 짚어보겠습니다.
"scripts" : 부분에서 generate-types 를 추가했었습니다. 이 부분은, supabase 에서 테이블을 추가하거나 필드를 추가, 수정, 삭제 했을 때에, supabase 에서의 db 테이블 형태를 지금 프로젝트에서 가져올때 오류가 나지 않도록 구조를 맞춰주는 명령어입니다.
프로젝트를 연 termainal 혹은 프로젝트의 vscode 상에서의 터미널에서 해당 명령어를 입력해줍니다
npm run generate-types
이렇게 하면 types_db.ts 파일이 제대로 바뀐 것을 확인해야 합니다. 간혹, 오류가 나는 경우들이 있습니다. 이러한 경우에는 types_db.ts 파일에 적힌 내용을 보셔야 합니다. supabase 버전을 높여야 한다거나 그러한 오류가 날 수 있으므로, 에러 메시지를 확인하기소 에러를 수정해주시면 됩니다.
테이블을 생성하고, 프로젝트에서도 구조를 맞춰줬으므로 이제 할 일은 포스팅을 볼 수 있고, 작성할 수 있는 페이지를 만들어보겠습니다.
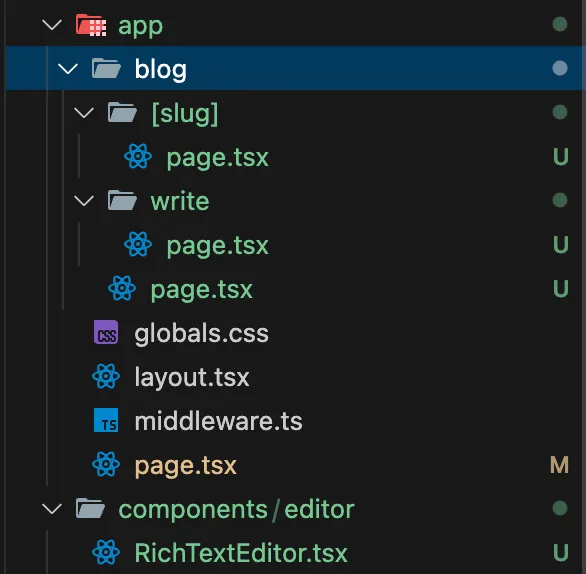
왼쪽 사진은 이번 작업의 파일 구조입니다.
Blog 를 포함 초록색으로 표시된 것은 새로 만들어졌거나, 해당 폴더 안에 새로 만들어진 파일이 있다는 표시입니다.
노란색은 수정이 되었다는 표시입니다
blog 폴더를 만들어 /blog 의 주소로 접속할 수 있는 설정을 해줍니다. Next 에서 폴더로 라우팅 설정을 하던 부분에 대한 설명을 다시 보고 싶으시다면 => 여기로
그리고 app 폴더 밖에서는 next.config.ts 파일을 수정했고, tailwind.config.ts 파일을 생성했습니다
굳이 필요하진 않은 설정이지만, 간혹 Next 에서 사진을 가져올 때에 오류가 나는 경우가 있어, 그걸 수정하기 위함이고, style 을 보다 세세하게 스타일링 하기 위한 설정입니다.
app/blog/[slug]/page.tsx
import { createServerSupabaseClient } from '@/utils/supabase/server';
import { notFound } from 'next/navigation';
import Image from 'next/image';
import Link from 'next/link';

interface PostPageProps {
  params: {
    slug: string;
  };
}

export default async function PostPage({ params }: PostPageProps) {
  const supabase = await createServerSupabaseClient();

  // 포스트 데이터 가져오기
  const { data: post, error } = await supabase
    .from('posts')
    .select('*')
    .eq('slug', params.slug)
    .eq('published', true)
    .single();

  if (error || !post) {
    notFound();
  }

  return (
    <div className="max-w-4xl mx-auto p-6">
      {/* 뒤로가기 링크 */}
      <div className="mb-8">
        <Link
          href="/blog"
          className="inline-flex items-center text-blue-600 hover:text-blue-800 transition-colors"
        >
          ← 블로그 목록으로 돌아가기
        </Link>
      </div>

      <article className="prose prose-lg max-w-none">
        {/* 헤더 */}
        <header className="mb-8 not-prose">
          {/* 태그들 */}
          {post.tags && post.tags.length > 0 && (
            <div className="flex flex-wrap gap-2 mb-4">
              {post.tags.map((tag: string, index: number) => (
                <span
                  key={index}
                  className="px-3 py-1 text-sm bg-blue-100 text-blue-600 rounded-full"
                >
                  {tag}
                </span>
              ))}
            </div>
          )}

          {/* 제목 */}
          <h1 className="text-4xl font-bold text-gray-900 mb-4">{post.title}</h1>

          {/* 메타 정보 => 아직 조회수랑 좋아요는 구현하기 전이어서 나중에 보여줄 칸만 만들어둠. */}
          <div className="flex items-center gap-6 text-gray-600 mb-6">
            {post.published_at && (
              <time dateTime={post.published_at}>
                {new Date(post.published_at).toLocaleDateString('ko-KR', {
                  year: 'numeric',
                  month: 'long',
                  day: 'numeric'
                })}
              </time>
            )}
            <span>   조회</span>
            <span>❤️  좋아요</span>
          </div>

          {/* 요약 */}
          {post.excerpt && (
            <div className="p-4 bg-gray-50 rounded-lg border-l-4 border-blue-500 mb-8">
              <p className="text-gray-700 italic">{post.excerpt}</p>
            </div>
          )}

          {/* 대표 이미지 */}
          {post.featured_image && (
            <div className="relative w-full h-64 md:h-96 rounded-lg overflow-hidden mb-8">
              <Image
                src={post.featured_image}
                alt={post.title}
                fill
                className="object-cover"
                priority
              />
            </div>
          )}
        </header>

        {/* 본문 */}
        <div
          className="prose-headings:text-gray-900 prose-a:text-blue-600 prose-a:no-underline hover:prose-a:underline prose-strong:text-gray-900 prose-code:text-pink-600 prose-code:bg-gray-100 prose-code:px-1 prose-code:py-0.5 prose-code:rounded"
          dangerouslySetInnerHTML={{ __html: post.content }}
        />
      </article>

      {/* 포스트 하단 액션 */}
      <div className="mt-12 pt-8 border-t border-gray-200">
        <div className="flex items-center justify-between">
          <div className="flex items-center gap-4">
            <button className="flex items-center gap-2 px-4 py-2 text-gray-600 hover:text-red-600 transition-colors">
              ❤️ 좋아요
            </button>
            <button className="flex items-center gap-2 px-4 py-2 text-gray-600 hover:text-blue-600 transition-colors">
                공유하기
            </button>
          </div>

          <div className="text-sm text-gray-500">
            마지막 수정: {post.updated_at && new Date(post.updated_at).toLocaleDateString('ko-KR')}
          </div>
        </div>
      </div>

      {/* 관련 포스트 섹션 (나중에 구현) */}
      <div className="mt-16">
        <h3 className="text-2xl font-bold text-gray-900 mb-6">다른 포스트 보기</h3>
        <div className="text-center py-8 text-gray-500">
          <p>관련 포스트 기능은 곧 추가될 예정입니다.</p>
          <Link
            href="/blog"
            className="inline-block mt-4 px-6 py-2 bg-blue-600 text-white rounded-md hover:bg-blue-700 transition-colors"
          >
            블로그 홈으로
          </Link>
        </div>
      </div>
    </div>
  );
}

// 메타데이터 생성 (SEO 나 링크 공유했을 때에 미리보기 사진, 제목, 설명 설정)
export async function generateMetadata({ params }: PostPageProps) {
  const supabase = await createServerSupabaseClient();

  const { data: post } = await supabase
    .from('posts')
    .select('title, excerpt, meta_description, featured_image')
    .eq('slug', params.slug)
    .eq('published', true)
    .single();

  if (!post) {
    return {
      title: '포스트를 찾을 수 없습니다',
    };
  }

  return {
    title: post.title,
    description: post.meta_description || post.excerpt || '큐라시의 블로그 포스트',
    openGraph: {
      title: post.title,
      description: post.meta_description || post.excerpt || '큐라시의 블로그 포스트',
      images: post.featured_image ? [post.featured_image] : [],
    },
  };
}
SEO 를 위한 설정들과 UI 에 대한 코드와 주석이 담겨있습니다. 혹시나 글로서 이해가 되지 않는 부분이 있다면 편하게 댓글을 남겨주세요.
해당 코드는 게시글의 작성일 기준으로, 추후 업데이트가 진행되며 제대로 작동을 하지 않는 부분들이 있을 수도 있으나, 자연스러운 현상이니 당황하지 않고 댓글로 소통해주시거나, 구글링을 해주시기 바랍니다
app/blog/write/page.tsx
'use client';

import { useState } from 'react';
import { useRouter } from 'next/navigation';
import dynamic from 'next/dynamic';
import { createBrowserSupabaseClient } from '@/utils/supabase/client';

// RichTextEditor를 동적으로 임포트 (SSR 비활성화)
const RichTextEditor = dynamic(
  () => import('@/components/editor/RichTextEditor'),
  {
    ssr: false,
    loading: () => <div className="border border-gray-300 rounded-lg h-64 flex items-center justify-center text-gray-500">에디터 로딩 중...</div>
  }
);

export default function WritePage() {
  const router = useRouter();
  const [formData, setFormData] = useState({
    title: '',
    content: '',
    excerpt: '',
    slug: '',
    published: false,
    category_id: null as number | null,
    tags: [] as string[],
    meta_description: '',
    featured_image: '',
  });
  const [tagInput, setTagInput] = useState('');
  const [isLoading, setIsLoading] = useState(false);
  const [featuredImageFile, setFeaturedImageFile] = useState<File | null>(null);

  // 슬러그 자동 생성
  const generateSlug = (title: string) => {
    return title
      .toLowerCase()
      .replace(/[^a-z0-9ㄱ-ㅎㅏ-ㅣ가-힣\s-]/g, '')
      .replace(/\s+/g, '-')
      .replace(/-+/g, '-')
      .trim();
  };

  // 대표 이미지 업로드
  const uploadFeaturedImage = async (file: File): Promise<string> => {
    const supabase = createBrowserSupabaseClient();
    const fileExt = file.name.split('.').pop();
    const fileName = `${Date.now()}-${Math.floor(Math.random() * 1000)}.${fileExt}`;
    const filePath = `featured-images/${fileName}`;

    const { error: uploadError } = await supabase.storage
      .from('blog-assets')
      .upload(filePath, file);

    if (uploadError) {
      throw uploadError;
    }

    const { data } = supabase.storage
      .from('blog-assets')
      .getPublicUrl(filePath);

    return data.publicUrl;
  };

  // 태그 추가
  const addTag = () => {
    if (tagInput.trim() && !formData.tags.includes(tagInput.trim())) {
      setFormData(prev => ({
        ...prev,
        tags: [...prev.tags, tagInput.trim()]
      }));
      setTagInput('');
    }
  };

  // 태그 제거
  const removeTag = (tagToRemove: string) => {
    setFormData(prev => ({
      ...prev,
      tags: prev.tags.filter(tag => tag !== tagToRemove)
    }));
  };

  // 읽기 시간 계산 (대략적으로)
  const calculateReadingTime = (content: string): number => {
    const wordsPerMinute = 200;
    const textLength = content.replace(/<[^>]*>/g, '').length;
    const words = textLength / 5; // 한국어는 글자 수로 계산
    return Math.ceil(words / wordsPerMinute);
  };
  // 폼 제출
  const handleSubmit = async (e: React.FormEvent, publish: boolean = false) => {
    e.preventDefault();
    setIsLoading(true);

    try {
      const supabase = createBrowserSupabaseClient();

      // 사용자 인증 확인
    //   const { data: { user } } = await supabase.auth.getUser();
    //   if (!user) {
    //     alert('로그인이 필요합니다.');
    //     return;
    //   }

      let featuredImageUrl = formData.featured_image;

      // 대표 이미지 업로드
      if (featuredImageFile) {
        featuredImageUrl = await uploadFeaturedImage(featuredImageFile);
      }

      // 슬러그가 비어있으면 제목으로 생성
      const slug = formData.slug || generateSlug(formData.title);

      // 읽기 시간 계산
      const readingTime = calculateReadingTime(formData.content);

      // 포스트 데이터 준비
      const postData = {
        title: formData.title,
        content: formData.content,
        excerpt: formData.excerpt || formData.content.replace(/<[^>]*>/g, '').substring(0, 200),
        slug,
        published: publish,
        // author_id: user.id,
        author_id: 1,
        category_id: formData.category_id,
        tags: formData.tags.length > 0 ? formData.tags : null,
        meta_description: formData.meta_description || formData.excerpt,
        reading_time: readingTime,
        featured_image: featuredImageUrl || null,
        published_at: publish ? new Date().toISOString() : null,
      };

      const { error } = await supabase
        .from('posts')
        .insert([postData]);

      if (error) {
        throw error;
      }

      alert(publish ? '포스트가 발행되었습니다!' : '포스트가 임시저장되었습니다!');
      router.push('/blog');
    } catch (error) {
      console.error('포스트 저장 오류:', error);
      alert('포스트 저장에 실패했습니다.');
    } finally {
      setIsLoading(false);
    }
  };

  return (
    <div className="max-w-4xl mx-auto p-6">
      <div className="mb-8">
        <h1 className="text-3xl font-bold text-gray-900 mb-2">새 포스트 작성</h1>
        <p className="text-gray-600">멋진 블로그 포스트를 작성해보세요!</p>
      </div>

      <form onSubmit={(e) => handleSubmit(e, false)} className="space-y-6">
        {/* 제목 */}
        <div>
          <label htmlFor="title" className="block text-sm font-medium text-gray-700 mb-2">
            제목 *
          </label>
          <input
            type="text"
            id="title"
            value={formData.title}
            onChange={(e) => {
              const title = e.target.value;
              setFormData(prev => ({
                ...prev,
                title,
                slug: generateSlug(title)
              }));
            }}
            className="w-full px-3 py-2 border border-gray-300 rounded-md focus:outline-none focus:ring-2 focus:ring-blue-500"
            placeholder="포스트 제목을 입력하세요"
            required
          />
        </div>

        {/* 슬러그 */}
        <div>
          <label htmlFor="slug" className="block text-sm font-medium text-gray-700 mb-2">
            슬러그 (URL)
          </label>
          <input
            type="text"
            id="slug"
            value={formData.slug}
            onChange={(e) => setFormData(prev => ({ ...prev, slug: e.target.value }))}
            className="w-full px-3 py-2 border border-gray-300 rounded-md focus:outline-none focus:ring-2 focus:ring-blue-500"
            placeholder="url-friendly-slug"
          />
          <p className="text-sm text-gray-500 mt-1">
            URL: /blog/{formData.slug || 'your-slug'}
          </p>
        </div>

        {/* 대표 이미지 */}
        <div>
          <label htmlFor="featured-image" className="block text-sm font-medium text-gray-700 mb-2">
            대표 이미지
          </label>
          <input
            type="file"
            id="featured-image"
            accept="image/*"
            onChange={(e) => setFeaturedImageFile(e.target.files?.[0] || null)}
            className="w-full px-3 py-2 border border-gray-300 rounded-md focus:outline-none focus:ring-2 focus:ring-blue-500"
          />
        </div>

        {/* 요약 */}
        <div>
          <label htmlFor="excerpt" className="block text-sm font-medium text-gray-700 mb-2">
            요약
          </label>
          <textarea
            id="excerpt"
            value={formData.excerpt}
            onChange={(e) => setFormData(prev => ({ ...prev, excerpt: e.target.value }))}
            className="w-full px-3 py-2 border border-gray-300 rounded-md focus:outline-none focus:ring-2 focus:ring-blue-500"
            rows={3}
            placeholder="포스트 요약을 입력하세요 (선택사항)"
          />
        </div>

        {/* 태그 */}
        <div>
          <label className="block text-sm font-medium text-gray-700 mb-2">
            태그
          </label>
          <div className="flex gap-2 mb-2">
            <input
              type="text"
              value={tagInput}
              onChange={(e) => setTagInput(e.target.value)}
              onKeyDown={(e) => {
                if (e.key === 'Enter') {
                  e.preventDefault();
                  addTag();
                }
              }}
              className="flex-1 px-3 py-2 border border-gray-300 rounded-md focus:outline-none focus:ring-2 focus:ring-blue-500"
              placeholder="태그를 입력하고 Enter를 누르세요"
            />
            <button
              type="button"
              onClick={addTag}
              className="px-4 py-2 bg-gray-100 text-gray-700 rounded-md hover:bg-gray-200"
            >
              추가
            </button>
          </div>
          <div className="flex flex-wrap gap-2">
            {formData.tags.map((tag, index) => (
              <span
                key={index}
                className="inline-flex items-center px-3 py-1 rounded-full text-sm bg-blue-100 text-blue-800"
              >
                {tag}
                <button
                  type="button"
                  onClick={() => removeTag(tag)}
                  className="ml-2 text-blue-600 hover:text-blue-800"
                >
                  ×
                </button>
              </span>
            ))}
          </div>
        </div>

        {/* SEO 메타 설명 */}
        <div>
          <label htmlFor="meta-description" className="block text-sm font-medium text-gray-700 mb-2">
            SEO 메타 설명
          </label>
          <textarea
            id="meta-description"
            value={formData.meta_description}
            onChange={(e) => setFormData(prev => ({ ...prev, meta_description: e.target.value }))}
            className="w-full px-3 py-2 border border-gray-300 rounded-md focus:outline-none focus:ring-2 focus:ring-blue-500"
            rows={2}
            placeholder="검색 엔진에 표시될 설명을 입력하세요"
            maxLength={160}
          />
          <p className="text-sm text-gray-500 mt-1">
            {formData.meta_description.length}/160 글자
          </p>
        </div>

        {/* 본문 에디터 */}
        <div>
          <label className="block text-sm font-medium text-gray-700 mb-2">
            본문 *
          </label>
          <RichTextEditor
            content={formData.content}
            onChange={(content) => setFormData(prev => ({ ...prev, content }))}
            placeholder="포스트 내용을 작성하세요..."
          />
        </div>

        {/* 버튼들 */}
        <div className="flex gap-4 pt-6">
          <button
            type="submit"
            disabled={isLoading || !formData.title || !formData.content}
            className="px-6 py-2 bg-gray-600 text-white rounded-md hover:bg-gray-700 disabled:opacity-50 disabled:cursor-not-allowed"
          >
            {isLoading ? '저장 중...' : '임시저장'}
          </button>
          <button
            type="button"
            onClick={(e) => handleSubmit(e, true)}
            disabled={isLoading || !formData.title || !formData.content}
            className="px-6 py-2 bg-blue-600 text-white rounded-md hover:bg-blue-700 disabled:opacity-50 disabled:cursor-not-allowed"
          >
            {isLoading ? '발행 중...' : '발행하기'}
          </button>
          <button
            type="button"
            onClick={() => router.back()}
            className="px-6 py-2 border border-gray-300 text-gray-700 rounded-md hover:bg-gray-50"
          >
            취소
          </button>
        </div>
      </form>
    </div>
  );
}
사용자 인증 부분은, 다음 단계에서 supabase 계정 인증 로그인 부분을 구현할 예정입니다.
이 페이지는, posts 테이블에 데이터를 생성하려고 하는 코드입니다.
Form 으로 생성할 폼을 두고, 어떤 필드들을 입력할지 지정하고 slug를 만들고, 이미지를 업로드하는 폼을 만듭니다.
이미지 업로드 자체를 Storage 폴더에 업로드 하겠습니다. 그 안에서 또 폴더들을 나누어 업로드 할 코드입니다.
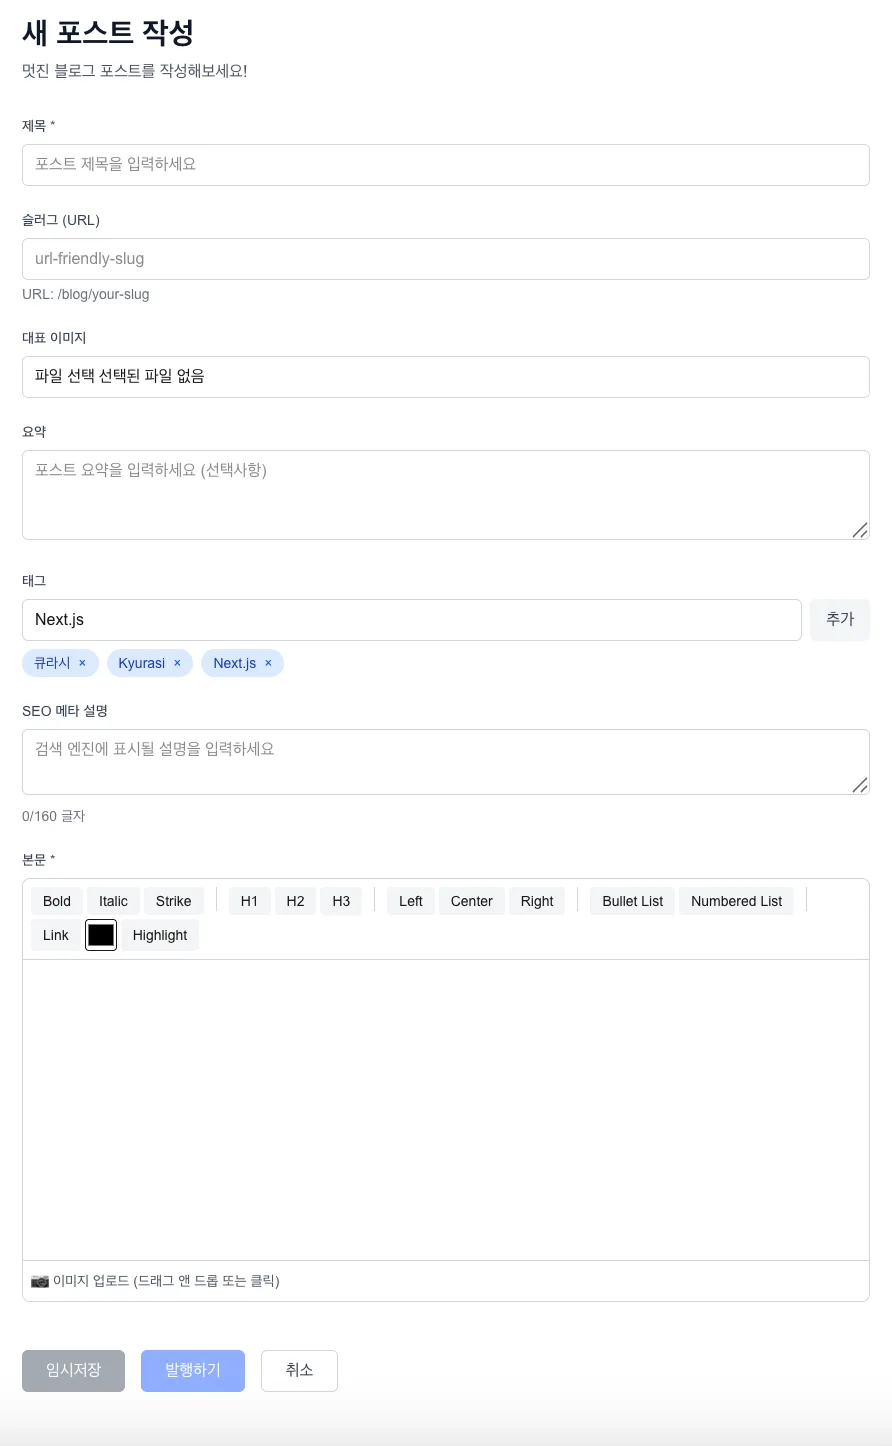
tag 를 하나하나 넣을 수 있는 코드를 추가하는 부분을 만들고, 똑같은 태그를 입력할 수 없도록 중복 방지도 넣었습니다.
내용을 입력하는 부분에는 RichTextEditor 로 내용을 입력하게 합니다. 이 부분은 app 폴더 밖에 만들어두겠습니다
components/editor/RichTextEditor.tsx
'use client';

import { useEditor, EditorContent } from '@tiptap/react';
import StarterKit from '@tiptap/starter-kit';
import Image from '@tiptap/extension-image';
import Link from '@tiptap/extension-link';
import TextStyle from '@tiptap/extension-text-style';
import Color from '@tiptap/extension-color';
import Highlight from '@tiptap/extension-highlight';
import TextAlign from '@tiptap/extension-text-align';
import { useCallback, useState } from 'react';
import { useDropzone } from 'react-dropzone';
import { createBrowserSupabaseClient } from '@/utils/supabase/client';

interface RichTextEditorProps {
  content: string;
  onChange: (content: string) => void;
  placeholder?: string;
}

const RichTextEditor = ({ content, onChange, placeholder }: RichTextEditorProps) => {
  const [isUploading, setIsUploading] = useState(false);

  const editor = useEditor({
    extensions: [
      StarterKit,
      Image.configure({
        inline: true,
        allowBase64: true,
      }),
      Link.configure({
        openOnClick: false,
      }),
      TextStyle,
      Color,
      Highlight,
      TextAlign.configure({
        types: ['heading', 'paragraph'],
      }),
    ],
    content,
    onUpdate: ({ editor }) => {
      onChange(editor.getHTML());
    },
    editorProps: {
      attributes: {
        class: 'prose prose-sm sm:prose lg:prose-lg xl:prose-2xl mx-auto focus:outline-none min-h-[300px] p-4',
      },
    },
  });

  // 이미지 업로드 함수
  const uploadImage = async (file: File): Promise<string> => {
    const supabase = createBrowserSupabaseClient();
    const fileExt = file.name.split('.').pop();
    const fileName = `${Math.random()}.${fileExt}`;
    const filePath = `blog-images/${fileName}`;

    const { error: uploadError } = await supabase.storage
      .from('blog-assets')
      .upload(filePath, file);

    if (uploadError) {
      throw uploadError;
    }

    const { data } = supabase.storage
      .from('blog-assets')
      .getPublicUrl(filePath);

    return data.publicUrl;
  };

  // 드롭존 설정
  const onDrop = useCallback(
    async (acceptedFiles: File[]) => {
      const file = acceptedFiles[0];
      if (file && editor) {
        setIsUploading(true);
        try {
          const url = await uploadImage(file);
          editor.chain().focus().setImage({ src: url }).run();
        } catch (error) {
          console.error('이미지 업로드 실패:', error);
          alert('이미지 업로드에 실패했습니다.');
        } finally {
          setIsUploading(false);
        }
      }
    },
    [editor]
  );

  const { getRootProps, getInputProps, isDragActive } = useDropzone({
    onDrop,
    accept: {
      'image/*': ['.png', '.jpg', '.jpeg', '.gif', '.webp']
    },
    multiple: false,
  });

  if (!editor) {
    return null;
  }

  return (
    <div className="border border-gray-300 rounded-lg overflow-hidden">
      {/* 툴바 */}
      <div className="border-b border-gray-300 p-2 flex flex-wrap gap-1">
        {/* 텍스트 스타일 */}
        <button
          onClick={() => editor.chain().focus().toggleBold().run()}
          className={`px-3 py-1 rounded text-sm ${
            editor.isActive('bold') ? 'bg-gray-800 text-white' : 'bg-gray-100'
          }`}
        >
          Bold
        </button>
        <button
          onClick={() => editor.chain().focus().toggleItalic().run()}
          className={`px-3 py-1 rounded text-sm ${
            editor.isActive('italic') ? 'bg-gray-800 text-white' : 'bg-gray-100'
          }`}
        >
          Italic
        </button>
        <button
          onClick={() => editor.chain().focus().toggleStrike().run()}
          className={`px-3 py-1 rounded text-sm ${
            editor.isActive('strike') ? 'bg-gray-800 text-white' : 'bg-gray-100'
          }`}
        >
          Strike
        </button>

        <div className="w-px h-6 bg-gray-300 mx-2" />

        {/* 헤딩 */}
        <button
          onClick={() => editor.chain().focus().toggleHeading({ level: 1 }).run()}
          className={`px-3 py-1 rounded text-sm ${
            editor.isActive('heading', { level: 1 }) ? 'bg-gray-800 text-white' : 'bg-gray-100'
          }`}
        >
          H1
        </button>
        <button
          onClick={() => editor.chain().focus().toggleHeading({ level: 2 }).run()}
          className={`px-3 py-1 rounded text-sm ${
            editor.isActive('heading', { level: 2 }) ? 'bg-gray-800 text-white' : 'bg-gray-100'
          }`}
        >
          H2
        </button>
        <button
          onClick={() => editor.chain().focus().toggleHeading({ level: 3 }).run()}
          className={`px-3 py-1 rounded text-sm ${
            editor.isActive('heading', { level: 3 }) ? 'bg-gray-800 text-white' : 'bg-gray-100'
          }`}
        >
          H3
        </button>

        <div className="w-px h-6 bg-gray-300 mx-2" />

        {/* 정렬 */}
        <button
          onClick={() => editor.chain().focus().setTextAlign('left').run()}
          className={`px-3 py-1 rounded text-sm ${
            editor.isActive({ textAlign: 'left' }) ? 'bg-gray-800 text-white' : 'bg-gray-100'
          }`}
        >
          Left
        </button>
        <button
          onClick={() => editor.chain().focus().setTextAlign('center').run()}
          className={`px-3 py-1 rounded text-sm ${
            editor.isActive({ textAlign: 'center' }) ? 'bg-gray-800 text-white' : 'bg-gray-100'
          }`}
        >
          Center
        </button>
        <button
          onClick={() => editor.chain().focus().setTextAlign('right').run()}
          className={`px-3 py-1 rounded text-sm ${
            editor.isActive({ textAlign: 'right' }) ? 'bg-gray-800 text-white' : 'bg-gray-100'
          }`}
        >
          Right
        </button>

        <div className="w-px h-6 bg-gray-300 mx-2" />

        {/* 리스트 */}
        <button
          onClick={() => editor.chain().focus().toggleBulletList().run()}
          className={`px-3 py-1 rounded text-sm ${
            editor.isActive('bulletList') ? 'bg-gray-800 text-white' : 'bg-gray-100'
          }`}
        >
          Bullet List
        </button>
        <button
          onClick={() => editor.chain().focus().toggleOrderedList().run()}
          className={`px-3 py-1 rounded text-sm ${
            editor.isActive('orderedList') ? 'bg-gray-800 text-white' : 'bg-gray-100'
          }`}
        >
          Numbered List
        </button>

        <div className="w-px h-6 bg-gray-300 mx-2" />

        {/* 링크 */}
        <button
          onClick={() => {
            const url = window.prompt('링크 URL을 입력하세요:');
            if (url) {
              editor.chain().focus().setLink({ href: url }).run();
            }
          }}
          className="px-3 py-1 rounded text-sm bg-gray-100"
        >
          Link
        </button>

        {/* 컬러 */}
        <input
          type="color"
          onChange={(e) => editor.chain().focus().setColor(e.target.value).run()}
          className="w-8 h-8 rounded border"
        />

        {/* 하이라이트 */}
        <button
          onClick={() => editor.chain().focus().toggleHighlight().run()}
          className={`px-3 py-1 rounded text-sm ${
            editor.isActive('highlight') ? 'bg-yellow-200' : 'bg-gray-100'
          }`}
        >
          Highlight
        </button>
      </div>

      {/* 에디터 영역 */}
      <div className="relative">
        <EditorContent editor={editor} />

        {/* 드래그 앤 드롭 오버레이 */}
        {isDragActive && (
          <div className="absolute inset-0 bg-blue-50 border-2 border-dashed border-blue-300 flex items-center justify-center z-10">
            <p className="text-blue-600 text-lg">이미지를 여기에 드롭하세요</p>
          </div>
        )}

        {/* 업로드 로딩 */}
        {isUploading && (
          <div className="absolute inset-0 bg-white bg-opacity-75 flex items-center justify-center z-20">
            <p className="text-gray-600">이미지 업로드 중...</p>
          </div>
        )}

        {/* 숨겨진 파일 입력 */}
        <div {...getRootProps()} className="sr-only">
          <input {...getInputProps()} />
        </div>
      </div>

      {/* 이미지 업로드 버튼 */}
      <div className="border-t border-gray-300 p-2">
        <button
          {...getRootProps()}
          className="text-sm text-gray-600 hover:text-gray-800"
          disabled={isUploading}
        >
          <input {...getInputProps()} />
            이미지 업로드 (드래그 앤 드롭 또는 클릭)
        </button>
      </div>
    </div>
  );
};

export default RichTextEditor;
이 파일은 블로그와 같이 게시글을 작성하기 위한 에디터 입니다.
저는 tiptap 이라는 text editor 을 사용했습니다.
다른 무료 에디터 비교
- Quill.js
- 장점: 단순, 빠른 설정
- 단점: React 통합이 어색, 커스터마이징 제한적
- 결론: React 프로젝트에선 비추천
- Draft.js (Meta)
- 장점: Facebook에서 개발, React 네이티브
- 단점: 더 이상 활발히 관리되지 않음 ⚠️
- 결론: 레거시 프로젝트
- Slate.js
- 장점: 매우 유연한 커스터마이징
- 단점: 너무 복잡, 기본 기능도 직접 구현해야 함
- 결론: 시간이 많이 걸림
- React-Quill
- 장점: Quill의 React 래퍼, 쉬운 설정
- 단점: 툴바 커스터마이징 어려움, 스타일링 제한
- 결론: 간단한 용도에는 OK
- Lexical (Meta)
- 장점: 최신 기술, 성능 좋음
- 단점: 아직 불안정 (1.0 미만), 문서 부족
- 결론: 아직 프로덕션에는 위험
생성과 read 부분 설정이 끝났으면, app 폴더 밖에서는 next.config.ts 파일을 수정해 혹시나 생길 수 있는 Next 에서의 Image 가져오기 오류를 위해 파일을 수정하고,
조금 더 상세한 스타일링을 위해 tailwind.config.ts 파일을 생성했습니다
next.config.ts
import type { NextConfig } from "next";

const nextConfig: NextConfig = {
    images: {
        remotePatterns: [
            {
                protocol: "https",
                hostname: "jetejraeplpinvfqzevu.supabase.co",
                port: "",
                pathname: "/storage/v1/object/public/**",
            },
            {
                protocol: "https",
                hostname: "*.supabase.co",
                port: "",
                pathname: "/storage/v1/object/public/**",
            },
            {
                protocol: "https",
                hostname: "images.unsplash.com",
                port: "",
                pathname: "/**",
            },
        ],
    },
};
export default nextConfig;
tailwind.config.ts
import type { Config } from 'tailwindcss'

const config: Config = {
  content: [
    './pages/**/*.{js,ts,jsx,tsx,mdx}',
    './components/**/*.{js,ts,jsx,tsx,mdx}',
    './app/**/*.{js,ts,jsx,tsx,mdx}',
  ],
  theme: {
    extend: {
      colors: {
        background: "var(--background)",
        foreground: "var(--foreground)",
      },
    },
  },
  plugins: [
    require('@tailwindcss/typography'),
  ],
}
export default config
이제 이 blog 페이지로 접근을 할 수 있는 코드를 둬야죠.
app/page.tsx 파일의 코드에서 /blog 로 이동할 수 있는 링크를 추가했습니다.
app/page.tsx
여기서 링크들을 모아놓은 부분에 링크를 추가
const links = [
    { name: "블로그 보기", href: "/blog" },
    { name: "새 포스트 작성", href: "/blog/write" },
    { name: "Our values", href: "#" },
    { name: "Meet our leadership", href: "#" },
];
이제 이 코드를 push 하고 재배포 되는걸 지켜보면 되겠습니다.
오우 쒵.. 오류가 났군요..
app/blog/[slug]/page.tsx
일단 오류부터 잡아보죠.
오류를 하나씩 확인해보니, .env 파일에 저장된 값들은 노출되면 안되는 값으로 gitignore 로 처리가 됩니다. 그렇다면 vercel 에서 env 파일을 읽을 수가 없었겠네요.
.env 파일을 수정해보겠습니다. 이는 vercel 에 올리기 전 변수명 때문에 public 노출로 보일 수 있을까 수정해두는 것입니다.
- 프로젝트 내에서 모든 NEXT_PUBLIC_SUPABASE_URL 를 찾아 SUPABASE_URL 로 이름을 바꾸겠습니다. .env 파일에서 변수명을 바꾸고, 모든 다른 파일에서 저 바뀐 변수명으로 가져오게 변경하는 작업입니다.
- NEXT_PUBLIC_SUPABASE_ANON_KEY 를 모두 SUPABASE_ANON_KEY 로 변경하겠습니다.
제발, 중요한 설정 변경할을 때에는 모두 한 번에 변경을 하지 마시고 하나씩 확인을 하시면서 변경해주시길 바라겠습니다!!
이렇게 변경한 후,
git add .
git commit -m ".env 파일 수정과 이를 가져오는 부분 수정"
git push orignin main
실행을 하여 코드를 배포해주고,
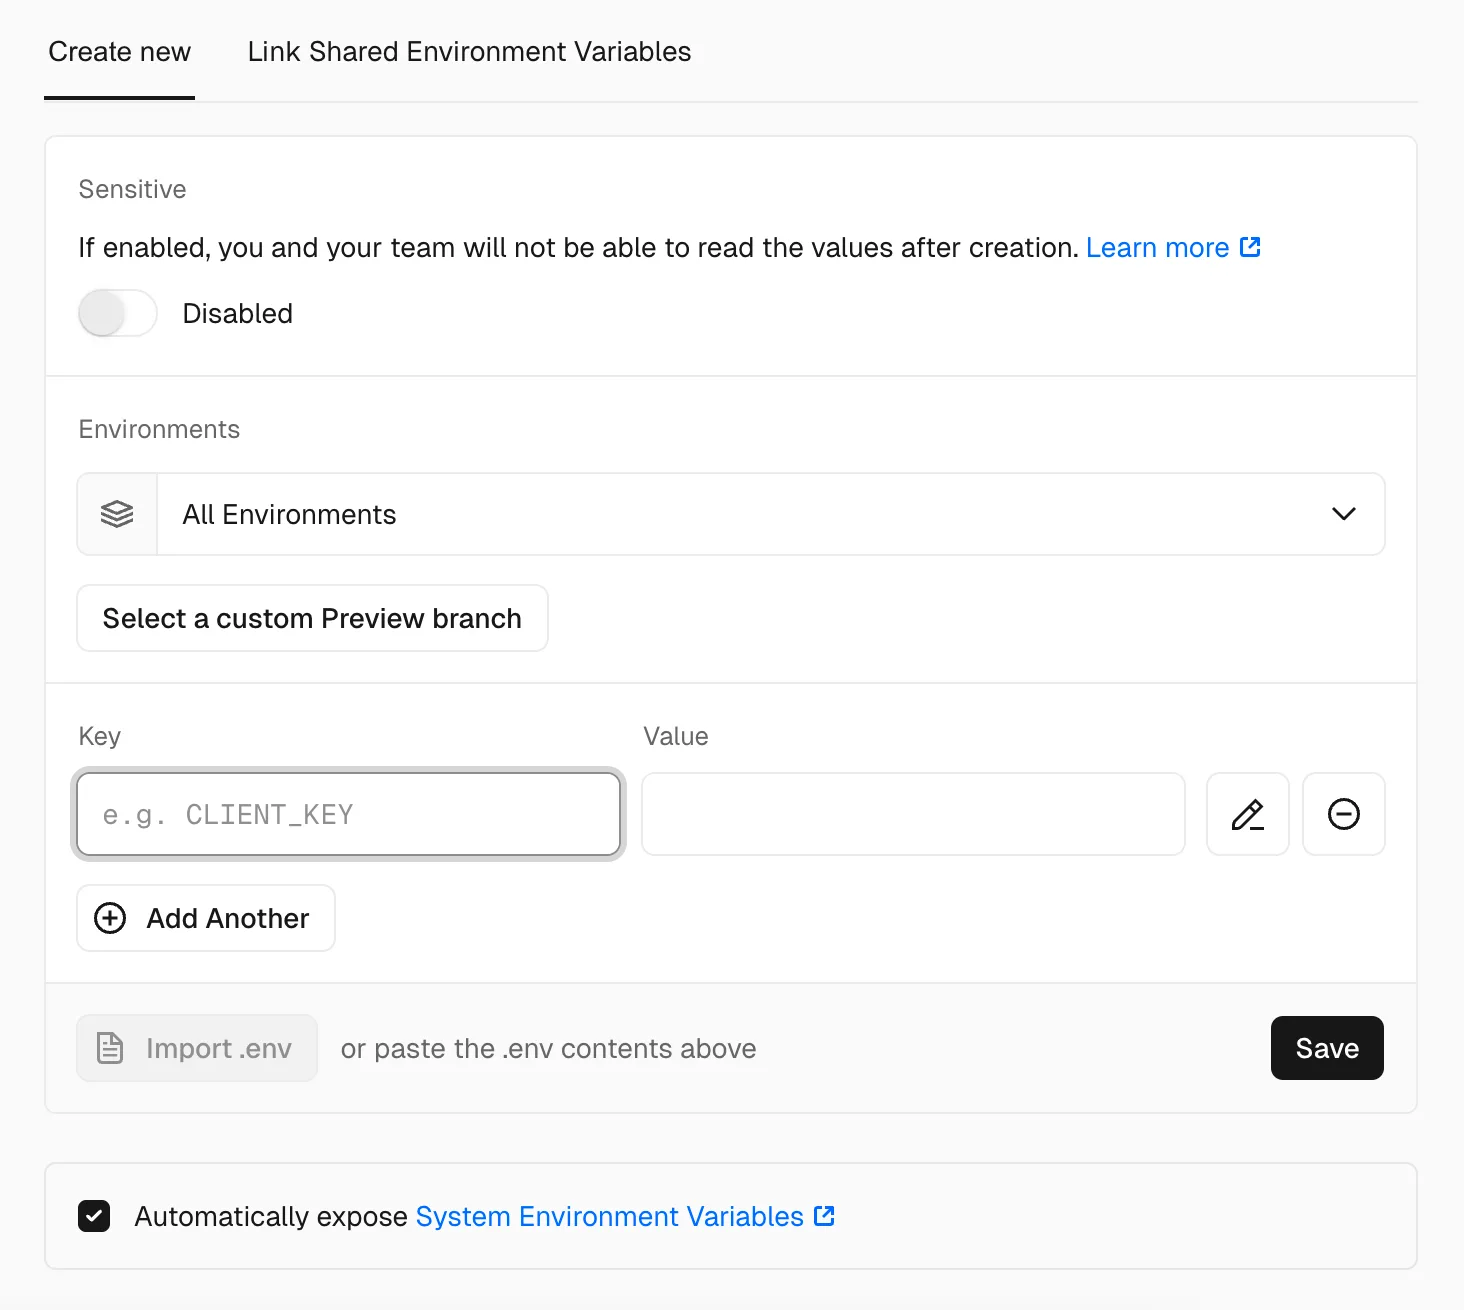
vercel 프로젝트로 들어가서 (supabase 말고 vercel 입니다)
1. 내 프로젝트 - Settings 클릭
2. Environment Variables 클릭
3. .env 파일에 있는 나의 설정들을 하나씩 복붙
4. save 한 후 Redeploy 실행
5. vercel 에서 배포된 나의 실제 페이지 확인!
이렇게 오류까지 확인해, .env 파일까지 수정하여 확실한 배포를 완료했습니다.
다음 포스팅에서 만든 포스트 수정, 삭제를 만들고, 디테일 페이지를 만드는 작업을 해보겠습니다!